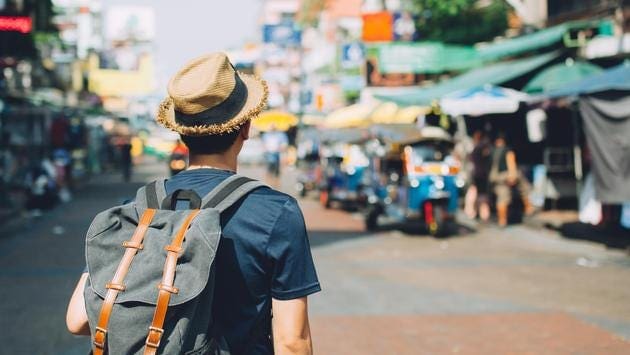
Traveling Solo
Adventures Through the Lens: a Solo Traveler’s Photography Guide

As a passionate solo traveler, I’ve always believed that photography is like capturing moments in time, preserving them forever in a single frame.
In my adventures through the lens, I’ve discovered the secrets to taking stunning photos while exploring the world alone.
Join me on this journey as I share invaluable advice on choosing the best cameras for solo travel, essential tips for capturing breathtaking shots, and techniques for using self-timers and tripods to create unforgettable memories.
Let’s embark on this photographic odyssey together!
Key Takeaways
- Consider the size, weight, and durability of the camera when choosing one for solo travel photography.
- Look for cameras with interchangeable lenses, built-in Wi-Fi or Bluetooth, and good low-light performance.
- Pack a lightweight and compact camera that fits easily into your backpack.
- Invest in a versatile lens and pay attention to composition, lighting, and angles for visually appealing shots.
Choosing the Right Camera for Solo Travel Photography
When choosing the right camera for solo travel photography, it’s important to consider its size and weight for convenience. As a solo traveler, you want a camera that is compact and lightweight, making it easy to carry around during your adventures.
Look for cameras with interchangeable lenses, as they offer versatility in capturing different types of shots. Additionally, consider the camera’s image quality and low-light performance to ensure your photos turn out stunning even in challenging lighting conditions.
Features such as built-in Wi-Fi or Bluetooth connectivity can also be advantageous for quickly transferring and sharing your photos on social media platforms.

Now that you have chosen the perfect camera, let’s dive into some essential tips for capturing stunning solo travel photos.
Essential Tips for Capturing Stunning Solo Travel Photos
To capture stunning solo travel photos, make sure to pack a lightweight camera that fits easily into your backpack. Opt for a mirrorless or compact camera that delivers high-quality images without weighing you down. Look for features like image stabilization and low-light capabilities to enhance your photography in various environments. Additionally, invest in a versatile lens, such as a wide-angle or zoom lens, to capture different perspectives and details during your travels.
When shooting solo travel photos, composition is key. Take time to scout locations and frame your shots thoughtfully. Consider the rule of thirds, leading lines, and points of interest within the frame to create visually appealing images.
Lighting can greatly impact the outcome of your photos. Take advantage of golden hour – the period shortly after sunrise or before sunset – when lighting is soft and warm. Experiment with different angles and positions to make the most of natural light.
Lastly, don’t forget about self-timers! In the next section, I will share tips on how to master self-timers and take perfect solo travel selfies for memorable moments on your journey.
Mastering the Art of Self-Timers: How to Take Perfect Solo Travel Selfies
Make sure you position yourself correctly and use a stable surface or tripod to capture perfect solo travel selfies with self-timers. Self-timers are a fantastic tool for solo travelers who want to include themselves in their travel photos.
To get the best results, find a well-lit spot and set up your camera on a sturdy surface or tripod. Make sure the camera is at eye level for flattering angles. Set the timer, get into position, and strike your best pose!

Remember to experiment with different backgrounds and perspectives to add variety to your shots. With self-timers, you can capture beautiful memories of your solo adventures without relying on strangers to take your photos.
Now, let’s dive into exploring the world through your lens: a guide to solo travel photography.
Exploring the World Through Your Lens: A Guide to Solo Travel Photography
Exploring the world through your lens can be a transformative and enriching experience for solo travelers who want to capture their adventures.
As a seasoned solo traveler and photography enthusiast, I understand the importance of capturing those precious moments on your journey.
When it comes to choosing the best camera for solo travel, I recommend opting for a lightweight mirrorless camera that offers excellent image quality and versatility. Additionally, make sure to pack extra batteries and memory cards to avoid running out of power or storage space.
To enhance your solo travel photography, consider using self-timers and tripods. These tools allow you to be in the frame while still capturing stunning landscapes or cityscapes. By investing in a wireless remote shutter release, you can easily take self-portraits without any hassle.
Unleashing Your Creativity: Composition Techniques for Solo Travel Photography
Unleash your creativity in solo travel photography by mastering composition techniques that will elevate your photos to the next level. Here are four essential tips to help you capture stunning images during your adventures:

-
Rule of Thirds: Divide your frame into a 3×3 grid and position key elements along these lines or at their intersections. This creates balance and visual interest.
-
Leading Lines: Incorporate natural or man-made lines, such as roads, rivers, or fences, to guide the viewer’s eye through the photo and add depth.
-
Framing: Utilize natural frames like archways, doorways, or tree branches to draw attention to your subject and create a sense of depth within the image.
-
Negative Space: Embrace empty spaces around your subject for a minimalist feel that emphasizes their importance and adds a sense of tranquility to the overall composition.
The Power of Tripods: Enhancing Your Solo Travel Photography Experience
Now that you’ve mastered composition techniques for your solo travel photography, it’s time to take your skills to the next level by exploring the power of tripods.
As a solo traveler, a tripod can be your best friend when it comes to capturing stunning images. It provides stability and helps eliminate camera shake, allowing you to achieve sharpness in every shot. Whether you’re shooting landscapes or self-portraits, having a tripod ensures consistent results.
When selecting a tripod for solo travel, consider factors like weight, size, and durability. Look for lightweight and compact options that won’t weigh you down on your adventures. Additionally, opt for tripods with sturdy materials such as carbon fiber or aluminum.

Using a tripod opens up endless possibilities for creativity in your photography. You can experiment with long exposure shots of flowing waterfalls or capture breathtaking night skies filled with stars. With the stability provided by a tripod, even intricate compositions and macro shots become accessible.
Don’t forget to bring along a remote shutter release or utilize the self-timer function on your camera when using a tripod for self-portraits. This way, you can position yourself in the frame and ensure perfect timing without rushing back and forth between the camera.
Investing in a quality tripod will greatly enhance your solo travel photography experience. So go ahead, embrace its power and watch as it takes your images to new heights!
Preserving Memories: Editing and Organizing Solo Travel Photos
When editing and organizing your solo travel photos, it’s important to create a system that allows you to easily locate and showcase your cherished memories. Here are four tips to help you preserve those special moments:
-
Create folders: Start by organizing your photos into folders based on location, date, or theme. This will make it easier to find specific photos later on.
-
Use keywords: Add descriptive keywords to each photo, such as the name of the place or an activity captured in the image. This will enable you to search for specific photos using these keywords.
-
Edit with purpose: Take the time to edit your photos and enhance their quality. Adjust brightness, contrast, and saturation levels to bring out the best in each image.

-
Backup regularly: Always make backups of your edited and organized photos. Whether it’s cloud storage or an external hard drive, having a backup ensures that you won’t lose those precious memories.
Frequently Asked Questions
What Are Some Recommended Accessories for Solo Travel Photography?
Some recommended accessories for solo travel photography include a lightweight tripod for stability, a remote shutter release to avoid camera shake, and extra memory cards to capture all those amazing moments.
How Can I Ensure the Safety of My Camera Equipment While Traveling Alone?
To ensure the safety of my camera equipment while traveling alone, I always carry a sturdy camera bag, use lens caps and filters, secure my gear with straps or locks, and avoid leaving it unattended.
Are There Any Specific Settings or Techniques That Can Help Me Capture Better Landscape Photos While Traveling Solo?
To capture stunning landscape photos while traveling solo, I recommend using a wide-angle lens to capture the breadth of the scenery. Experiment with different perspectives and compositions, and don’t forget to make use of natural light for breathtaking results.
What Are Some Tips for Capturing Candid Moments of Locals or Wildlife While Traveling Alone?
To capture candid moments of locals or wildlife while traveling alone, I recommend using a telephoto lens for distance, shooting in burst mode to capture multiple frames, and staying patient to wait for those perfect unposed moments.
How Can I Overcome the Challenge of Taking Self-Portraits in Crowded Tourist Areas While Traveling Solo?
To overcome the challenge of taking self-portraits in crowded tourist areas while traveling solo, I recommend finding less crowded spots nearby, using a tripod or a selfie stick with a remote control, and asking fellow travelers for help.

Hello there! I’m Gabriel Holmes, a 41-year-old travel enthusiast with a degree in Marketing from the Indiana University Northwest. I’m the voice behind TopWorldTravels.com, where I channel my passion for exploration into engaging travel narratives and invaluable tips.
My journey into the world of travel is a personal odyssey, fueled by a desire to uncover the beauty and diversity our planet has to offer. Over the years, I’ve wandered through countless destinations, immersing myself in various cultures and capturing the essence of each experience through my writing. From the bustling streets of metropolitan cities to the serene landscapes off the beaten path, I’ve made it my mission to share the gems I discover along the way.
Armed with my marketing background from IUN, I approach travel with a strategic and analytical mindset. This expertise allows me to curate content on TopWorldTravels.com that resonates with a diverse audience. Whether you’re a budget backpacker or a luxury traveler, my goal is to provide insights that cater to all tastes and preferences.
Beyond the typical tourist spots, I’m committed to uncovering the authentic heart of each destination. My writings not only offer practical advice on packing and navigating unfamiliar terrains but also emphasize the importance of responsible tourism. I believe in leaving a positive impact on the places I visit, promoting sustainable practices that preserve the environment and support local communities.
Join me on my virtual expeditions at TopWorldTravels.com, where my words weave a tapestry of discovery, wanderlust, and cultural appreciation. Travel, for me, is more than a leisure activity; it’s a transformative journey that enriches the soul and broadens horizons. Let TopWorldTravels.com be your compass to a world of unforgettable experiences, as we embark on this vicarious adventure together.
Traveling Solo
What are the best travel destinations to experience local street food?

Introduction to Global Culinary Adventures
Embarking on a journey around the world to discover the most tantalizing street food is not just about satisfying your taste buds. It’s an immersive experience that offers a window into the soul of a culture. Through gastronomy tours and visits to culinary hotspots, travelers can enjoy street cuisine that ranges from the exotic to the familiar, all while exploring vibrant food markets and authentic eateries. This guide aims to unveil the top destinations where the streets are not just pathways but a bustling gallery of local delicacies waiting to be explored.
Asia: A Continent of Flavorful Mysteries
Asia stands out as a continent where street food is not just food; it’s a way of life. From the bustling markets of Bangkok to the quiet alleys of Kyoto, every corner offers something unique.
Bangkok, Thailand, is often considered the street food capital of the world. Here, visitors can indulge in everything from spicy pad Thai to sweet mango sticky rice, all served with the warmth and hospitality that Thais are known for.
Moving eastward, Tokyo, Japan, offers a different kind of street food experience. While it’s famous for its Michelin-starred restaurants, the street food, like takoyaki (octopus balls) and yakitori (grilled chicken skewers), provides a delicious and quick alternative that reflects the meticulous nature of Japanese cuisine.
Latin America: A Symphony of Flavors
In Latin America, street food is a colorful and vibrant part of daily life. Mexico City, Mexico, is a treasure trove of culinary delights. Tacos, tamales, and quesadillas are just the beginning. The city’s markets are alive with the sights, sounds, and smells of cooking, offering an authentic taste of Mexican culture.
Further south, Lima, Peru, is emerging as a gastronomy tour hotspot. Ceviche, a local specialty made from fresh fish cured in citrus juices, can be found on almost every street corner, showcasing the country’s rich seafood tradition.
Europe: A Tapestry of Taste
Europe might not be the first continent that comes to mind when thinking of street food, but it offers an array of unique local delicacies. Istanbul, Turkey, straddles two continents and offers a fusion of flavors in its street food. From savory kebabs to sweet baklava, Istanbul’s streets reflect its diverse cultural heritage.
In Italy, street food varies from region to region. In Naples, pizza fritta, a deep-fried pizza, is a must-try, reflecting the city’s love for its most famous export, pizza. Meanwhile, in Sicily, arancini, fried rice balls filled with ragu, peas, and mozzarella, offer a delicious snack on the go.
Africa: A Feast for the Senses
Africa’s street food scene is as diverse as its landscapes. Marrakech, Morocco, is renowned for its bustling food markets, where travelers can sample everything from tagines to couscous, flavored with a blend of spices unique to Moroccan cuisine.
In Cape Town, South Africa, the influence of many cultures can be tasted in its street food. Bunny chow, a hollowed-out loaf of bread filled with curry, is a South African street food staple that reflects the country’s Indian influences.
North America: A Melting Pot of Street Food Cultures
North America’s street food scene is as diverse as its population. In the United States, New York City offers an array of street food options that reflect its multicultural makeup. From halal carts serving up gyro and rice to taco stands dotting the city’s corners, there’s something for everyone.
Vancouver, Canada, is known for its Asian culinary influence, with food trucks offering everything from Japanese takoyaki to Chinese dim sum, making it a perfect destination for those looking to sample a variety of Asian cuisines outside of Asia.
Conclusion: The World Awaits Your Palate
The best travel destinations to experience local street food are those that offer not just food, but a glimpse into the culture and heart of a place. Whether it’s the spicy, tangy flavors of Bangkok or the rich, savory delights of Istanbul, each destination offers a unique culinary adventure. Through gastronomy tours, visits to food markets, and stops at authentic eateries, travelers can immerse themselves in the local culture, one bite at a time. So, pack your appetite and set off on a journey to discover the world’s culinary hotspots, where the love for food transcends language and unites us all.
Hello there! I’m Gabriel Holmes, a 41-year-old travel enthusiast with a degree in Marketing from the Indiana University Northwest. I’m the voice behind TopWorldTravels.com, where I channel my passion for exploration into engaging travel narratives and invaluable tips.
My journey into the world of travel is a personal odyssey, fueled by a desire to uncover the beauty and diversity our planet has to offer. Over the years, I’ve wandered through countless destinations, immersing myself in various cultures and capturing the essence of each experience through my writing. From the bustling streets of metropolitan cities to the serene landscapes off the beaten path, I’ve made it my mission to share the gems I discover along the way.
Armed with my marketing background from IUN, I approach travel with a strategic and analytical mindset. This expertise allows me to curate content on TopWorldTravels.com that resonates with a diverse audience. Whether you’re a budget backpacker or a luxury traveler, my goal is to provide insights that cater to all tastes and preferences.
Beyond the typical tourist spots, I’m committed to uncovering the authentic heart of each destination. My writings not only offer practical advice on packing and navigating unfamiliar terrains but also emphasize the importance of responsible tourism. I believe in leaving a positive impact on the places I visit, promoting sustainable practices that preserve the environment and support local communities.
Join me on my virtual expeditions at TopWorldTravels.com, where my words weave a tapestry of discovery, wanderlust, and cultural appreciation. Travel, for me, is more than a leisure activity; it’s a transformative journey that enriches the soul and broadens horizons. Let TopWorldTravels.com be your compass to a world of unforgettable experiences, as we embark on this vicarious adventure together.
Traveling Solo
Top Romantic Getaways Near Maryland: Discover Chesapeake Bay, Shenandoah Valley & More

When it comes to planning the perfect romantic getaway, couples often seek destinations that offer a blend of relaxation, adventure, and intimacy. Near Maryland, there are several spots that stand out for their unique charm, breathtaking landscapes, and romantic ambiance. From the serene waters of Chesapeake Bay to the majestic mountains of Shenandoah Valley, let’s explore the best vacation spots for couples looking for that unforgettable retreat.
Chesapeake Bay: A Serene Waterside Escape
Chesapeake Bay is renowned for its tranquil waters, picturesque lighthouses, and abundant seafood, making it an ideal spot for couples. The bay’s vast expanse offers numerous activities such as sailing, kayaking, and fishing, allowing couples to bond over shared adventures. For those seeking relaxation, the bay’s shores are dotted with quaint bed and breakfasts and luxury resorts, providing the perfect backdrop for a romantic sunset.
Shenandoah Valley: Nature’s Romantic Backdrop
The Shenandoah Valley, with its rolling hills, vibrant wildflowers, and panoramic views, is a haven for couples who love nature. The valley’s scenic drives, such as the Skyline Drive, offer breathtaking vistas of the Virginia countryside. Hiking trails lead to hidden waterfalls and overlooks, offering secluded spots for picnics or quiet moments together. The region’s vineyards also offer wine tastings and tours, adding a touch of elegance to your romantic getaway.
Deep Creek Lake: A Year-Round Romantic Destination
Deep Creek Lake, Maryland’s largest freshwater lake, is a year-round destination for couples. In the warmer months, the lake becomes a playground for water sports, hiking, and golfing. The fall brings stunning foliage that transforms the landscape, ideal for scenic drives or cozying up in a lakeside cabin. Winter at Deep Creek Lake is equally magical, with opportunities for skiing, snowboarding, and ice fishing, followed by evenings spent by the fireplace.
Virginia Beach: Sun, Sand, and Romance
For couples who dream of a beach getaway, Virginia Beach offers miles of sandy shores, warm waves, and vibrant boardwalks. Days can be spent sunbathing, surfing, or exploring the city’s cultural attractions, while nights are perfect for romantic walks along the moonlit beach. The area’s fine dining and entertainment options ensure that every moment of your stay is filled with romance and excitement.
Cape May: A Victorian Seaside Gem
Cape May stands out for its Victorian charm, historic architecture, and inviting beaches. This seaside resort town is perfect for couples who appreciate the elegance of bygone eras. Horse-drawn carriage rides, guided tours of Victorian mansions, and sunset sails add a romantic touch to your visit. Cape May’s award-winning wineries and gourmet restaurants offer intimate dining experiences, making every meal a memorable part of your romantic getaway.
Creating Lasting Memories Together
Choosing the best vacation spot for a romantic getaway near Maryland depends on what you and your partner value most—be it adventure, relaxation, or cultural experiences. Each of these destinations offers something unique, from serene waterside retreats and nature-filled adventures to beachside escapes and historic explorations.
Spending quality time together in these beautiful settings allows couples to strengthen their bond, create lasting memories, and experience the joy of discovery. Whether it’s a weekend escape or a longer retreat, these spots near Maryland promise a blend of romance, beauty, and shared experiences that will deepen your connection and leave you both with stories to cherish for years to come.
In planning your getaway, consider what activities you both enjoy, the type of scenery you find most romantic, and the level of adventure you’re seeking. Whether it’s exploring the great outdoors, enjoying fine dining and wine tasting, or simply relaxing by the water, these destinations offer endless possibilities for creating those perfect moments together.
As you embark on your romantic journey, remember that the most important aspect of any vacation is the time spent with your loved one. These vacation spots near Maryland are not just about the places you’ll visit but about the moments you’ll share and the memories you’ll create together. So pack your bags, set your sights on romance, and let the beauty of these destinations bring you closer than ever before.
Hello there! I’m Gabriel Holmes, a 41-year-old travel enthusiast with a degree in Marketing from the Indiana University Northwest. I’m the voice behind TopWorldTravels.com, where I channel my passion for exploration into engaging travel narratives and invaluable tips.
My journey into the world of travel is a personal odyssey, fueled by a desire to uncover the beauty and diversity our planet has to offer. Over the years, I’ve wandered through countless destinations, immersing myself in various cultures and capturing the essence of each experience through my writing. From the bustling streets of metropolitan cities to the serene landscapes off the beaten path, I’ve made it my mission to share the gems I discover along the way.
Armed with my marketing background from IUN, I approach travel with a strategic and analytical mindset. This expertise allows me to curate content on TopWorldTravels.com that resonates with a diverse audience. Whether you’re a budget backpacker or a luxury traveler, my goal is to provide insights that cater to all tastes and preferences.
Beyond the typical tourist spots, I’m committed to uncovering the authentic heart of each destination. My writings not only offer practical advice on packing and navigating unfamiliar terrains but also emphasize the importance of responsible tourism. I believe in leaving a positive impact on the places I visit, promoting sustainable practices that preserve the environment and support local communities.
Join me on my virtual expeditions at TopWorldTravels.com, where my words weave a tapestry of discovery, wanderlust, and cultural appreciation. Travel, for me, is more than a leisure activity; it’s a transformative journey that enriches the soul and broadens horizons. Let TopWorldTravels.com be your compass to a world of unforgettable experiences, as we embark on this vicarious adventure together.
Traveling Solo
Top Affordable Romantic Getaways in Virginia for Couples: Your Ultimate Guide to Retreats

Virginia, often referred to as the “Old Dominion,” is a state brimming with charm, history, and natural beauty, making it an ideal destination for couples seeking both romance and affordability. From the serene beaches of the Eastern Shore to the majestic Blue Ridge Mountains, Virginia offers a diverse array of settings for a memorable getaway. This guide aims to highlight the best affordable romantic getaways in Virginia, ensuring that every couple can find their perfect retreat without breaking the bank.
Discovering Virginia’s Romantic Retreats
Virginia’s rich tapestry of landscapes serves as the perfect backdrop for romance. Whether you’re celebrating an anniversary, planning a surprise weekend away, or simply looking to spend quality time together, Virginia’s romantic getaways cater to a wide range of interests and preferences.
Beach Getaways: Sun, Sand, and Surf
For those who dream of relaxing by the sea, Virginia Beach offers a perfect blend of sun, sand, and surf. Beyond its famous boardwalk and stunning ocean views, couples can discover hidden gems such as the secluded beaches of First Landing State Park or the serene Back Bay National Wildlife Refuge. Accommodations in the area range from cozy beachfront cottages to luxury resorts, all offering special packages to make your stay both affordable and unforgettable.
Mountain Escapes: Serenity and Scenery
If you’re drawn to the tranquility of the mountains, the Shenandoah Valley and the Blue Ridge Mountains provide a breathtaking setting for a romantic escape. Couples can explore the scenic beauty of Shenandoah National Park, with its picturesque hiking trails and panoramic vistas. Quaint mountain cabins and bed-and-breakfasts dot the region, offering a secluded and intimate experience. Many of these retreats feature special amenities such as hot tubs and fireplaces, adding an extra touch of romance to your mountain getaway.
Historic Hideaways: Charm and Character
Virginia’s rich history is reflected in its numerous historic towns and landmarks. Couples with a love for the past can step back in time in Colonial Williamsburg, where the beautifully restored 18th-century buildings and reenactments bring history to life. Alternatively, the charming small towns of Middleburg and Abingdon offer a slower pace of life, with their antique shops, art galleries, and historic inns. These towns provide a romantic setting that combines comfort with a sense of history, all at an affordable price.
Wine Country Weekends: Sipping and Savoring
Virginia’s burgeoning wine country offers an ideal getaway for couples who enjoy sipping and savoring local flavors. The state’s wine regions, including Loudoun County and the Monticello Wine Trail, boast numerous vineyards and wineries where couples can indulge in wine tastings and vineyard tours. Many wineries also offer cozy lodging options, from rustic cottages to elegant bed-and-breakfasts, nestled among the vines. These romantic retreats often include wine-themed packages, making for an affordable and indulgent escape.
Outdoor Adventures: Thrills and Bonding
For adventurous couples, Virginia’s diverse landscapes offer endless opportunities for outdoor activities. Kayaking on the James River, hiking in the Appalachian Mountains, or horseback riding in the countryside are just a few ways to experience Virginia’s natural beauty together. Many outdoor retreats provide affordable accommodation options, such as camping sites, yurts, and eco-friendly lodges, allowing couples to immerse themselves in nature without overspending.
Planning Your Affordable Romantic Getaway in Virginia
When planning your romantic getaway in Virginia, consider visiting during the off-peak season or mid-week to take advantage of lower rates and fewer crowds. Additionally, many accommodations and attractions offer special deals and packages for couples, including romantic extras like champagne, chocolates, and late check-out. By doing a bit of research and planning ahead, you can create a memorable and affordable romantic retreat in Virginia that perfectly suits your preferences and budget.
In conclusion, Virginia’s diverse offerings make it a prime destination for couples seeking romance, adventure, and relaxation. Whether you’re drawn to the beach, the mountains, historic towns, wine country, or outdoor adventures, you’ll find an array of affordable romantic getaways in Virginia that promise to create lasting memories for you and your partner. So pack your bags, set off on a journey of discovery, and experience the magic of Virginia’s romantic retreats.
Hello there! I’m Gabriel Holmes, a 41-year-old travel enthusiast with a degree in Marketing from the Indiana University Northwest. I’m the voice behind TopWorldTravels.com, where I channel my passion for exploration into engaging travel narratives and invaluable tips.
My journey into the world of travel is a personal odyssey, fueled by a desire to uncover the beauty and diversity our planet has to offer. Over the years, I’ve wandered through countless destinations, immersing myself in various cultures and capturing the essence of each experience through my writing. From the bustling streets of metropolitan cities to the serene landscapes off the beaten path, I’ve made it my mission to share the gems I discover along the way.
Armed with my marketing background from IUN, I approach travel with a strategic and analytical mindset. This expertise allows me to curate content on TopWorldTravels.com that resonates with a diverse audience. Whether you’re a budget backpacker or a luxury traveler, my goal is to provide insights that cater to all tastes and preferences.
Beyond the typical tourist spots, I’m committed to uncovering the authentic heart of each destination. My writings not only offer practical advice on packing and navigating unfamiliar terrains but also emphasize the importance of responsible tourism. I believe in leaving a positive impact on the places I visit, promoting sustainable practices that preserve the environment and support local communities.
Join me on my virtual expeditions at TopWorldTravels.com, where my words weave a tapestry of discovery, wanderlust, and cultural appreciation. Travel, for me, is more than a leisure activity; it’s a transformative journey that enriches the soul and broadens horizons. Let TopWorldTravels.com be your compass to a world of unforgettable experiences, as we embark on this vicarious adventure together.


Discover Your Dream Destination: Take Our Vacation Recommendation Quiz Now!

Discover the Most Beautiful Places in the US: From Grand Canyon to Savannah

Discover the Ultimate All-Inclusive Weekend Getaway Packages for Couples: From Romantic Retreats to Luxury Beachfront Spas

Adventures Through the Lens: a Solo Traveler’s Photography Guide

Solo Travel: Mastering the Art of Getting Around

From Foreigner to Local: Cultural Adaptation Explained for Expats
-
Traveling Solo5 months ago
Solo Travel: Mastering the Art of Getting Around
-
ExPat Destinations7 months ago
From Foreigner to Local: Cultural Adaptation Explained for Expats
-
Traveling Solo5 months ago
The Exciting Chronicles of Solo Travel Experiences
-
ExPat Destinations8 months ago
Building Connections: the Importance of Expat Communities
-
Senior Travel8 months ago
Voyage Through Majestic Canadian Waters
-
Traveling Solo7 months ago
Unpack the Perfect Journey: Mastering Your Packing Essentials
-
ExPat Destinations6 months ago
Making It Official: Understanding Visa and Residency for Expats
-
Traveling Solo6 months ago
Climate Compliant: Packing for Different Climates